This article is in collaboration with Fermentools.
Fermenting food has been all the rage for a few years now. And for good reason—all those probiotics that are created during the fermentation process are really good for your intestinal health. We have been practicing the art of fermenting with the Starter Kit from Fermentools for the past few weeks.
The idea of fermenting food isn’t a new one. In the days before refrigeration, it was used as a natural preservative. During the fermenting process, microorganisms (such as bacteria and yeast) work to convert the sugars and starches in your food into alcohol (like when grapes become wine) or acid (which turns food tart, like sauerkraut). The bacteria that grow during this process are “good bacteria,” or probiotics. When you consume food that contains these probiotics, you’re doing your intestines a favor by helping to balance out some of the “bad” bacteria you might have from eating processed foods.
It sounds a bit complicated, but even if you don’t fully understand the science, fermenting food at home is easy, especially with the Starter Kit from Fermentools!
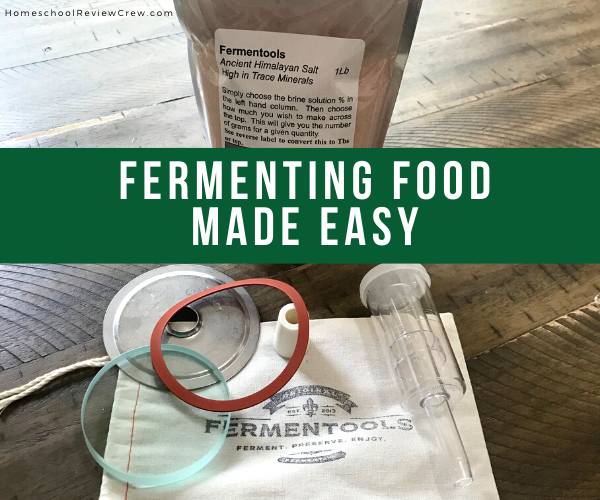
When you order the starter kit, you’ll get everything you need to turn a basic wide-mouthed Mason jar (of any size) into your own little fermenting pot. Let’s take a moment to go over the different pieces included in the starter kit, and then we’ll discuss the process of fermenting food with Fermentools.
- The stainless-steel lid is much heavier duty than a standard Mason jar lid. It also has one other defining characteristic: the hole in the middle. This hole is where you’ll put the rubber stopper and airlock later.
- The glass weight is super thick glass, very dense so you don’t have to worry about it breaking.
- The air lock is the only item in this kit that’s not made in America (it’s made in Canada). It’s also arguably the most important piece of the entire kit. The airlock is what allows you to ferment your food easily. It provides the mechanism for the good bacteria to thrive while keeping bad bacteria (which come from oxygen) out of your fermenting pot.
- The rubber stopper closes up the hole in the lid and gives you a place to put the air lock.
- A 1-lb bag of Himalayan pink salt is used to make the brine for fermenting food. Any salt will technically work, but the pink salt in the Fermentools kit is specially designed with tons of trace minerals. It’s also very fine, which allows for easy dissolving.
- The instruction guide gives you a basic overview of everything you need to know to begin creating fermented food. It also includes a recipe for sauerkraut and another one for fermented asparagus.
Add your own jar and the food you want to ferment, and you’re ready to go!
Fermenting Foods is Easy!
As I mentioned before, the process is quite easy. What’s not easy is choosing a recipe to start with! Once you’ve done that, though, the steps toward fermenting food are very straightforward.
First, pack your food into a wide-mouthed Mason jar. Fermentools recommends packing the jar very tightly, especially if you’re making something like sauerkraut (fermented cabbage). With your jar packed tight, you then create a brine. This is done using the Himalayan pink salt found in your starter kit. The bag of salt has two handy tables on it to help you be successful in your fermenting journey. On one side is the amount of salt in grams that you need to add to a certain amount of water to create the potency of brine you desire. On the other side, those gram measurements are translated into volume metrics (teaspoons and tablespoons) to make it easy to measure if you don’t have a kitchen scale. You should always create your brine using non-chlorinated water – ideally, distilled bottled water from the grocery store.
Now that you’ve packed your jar and made your brine, carefully pour the brine over your food. Things will start to float when you do this, but don’t worry. You’ll take care of that in a minute. When the jar is full (be sure to leave a bit of room at the top – at least an inch), you place the glass weight on top of your food. This pushes it back below the level of the brine, which is important to make sure everything ferments together. Then you put on the special Fermentools rubber canning gasket and stainless steel lid. Secure the lid with the band that came with your jar (save the original lid for later). Plug up the hole in the special lid with the rubber stopper, then add the airlock to the top of that. Fill your airlock half full of water, and you’re done! Simply wait a while, anywhere from a few days to a couple of weeks depending on what your recipe says, and then enjoy your very own homemade fermented food!
Thank you to Wendy of Ladybug Daydreams
for writing this introductory post.


You are next… Click here to enter
This list will close in 2 hrs, 57 min (1/21/2022 3:00 PM North America – Eastern Standard Time)
3 thoughts on “Fermenting Food Made Easy with Fermentools”